
How to Install the Seismic Fixture Clamp (SFC)
Apply these following steps to provide positive attachment of light fixtures to suspended ceiling grids:
- Orient the SFC1s at the end of the lighting fixture.
The label should face the end of the lighting fixture - not the side.
Watch the 1 minute 30 second video at right.
- Gently lift up one end of the lighting fixture.
- Place the first SFC1 onto one end corner of the lighting fixture.
- Place the second SFC1 onto the other end corner of the lighting fixture. Lower the lighting fixture's end back onto the T-bar.
- The lighting fixture corner lip now rests snugly on top of the SFC1's flange and the SFC1 sits on top of the T-bar corner.
- Repeat steps 1 to 5 for the lighting fixture's other end corner.
- Use a power drill to insert the screw into the pilot hole in the SFC. Screw the self-tapping screw to the SFC1, label side first.
If the screw penetrates the fixture, drilling a 1/8" pilot hole through the SFC into the fixture prior to installing the screw will help ease the task.
Screw the SFCs at the other 3 corners to complete the SFC installation.
To order Seismic Fixture Clamps (SFCs), ![]()
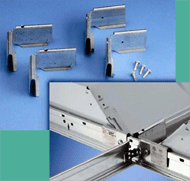
The lighting fixture is suspended to the ceiling grid by Seismic Fixture Clamps (SFC) at all four corners to ensure that it is earthquake safe.
How to install SFC